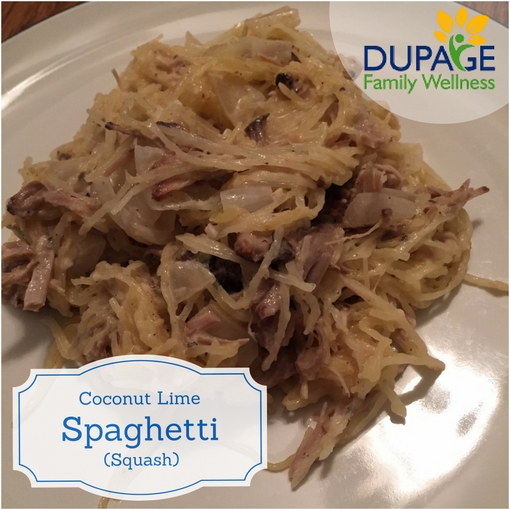
Since changing our diet to "Eating Real Food" we prefer to make our own sauces. The store bought ones tend to be loaded with ingredients that are hard to pronounce and have tons of extra sugar. In doing this, one of our staples that we buy at the grocery store each week is coconut milk! In most grocery stores, it is found in the Asian food section. Buy the FULL FAT version. These are GOOD FATS from coconuts, and therefore there is no need to be afraid of them! Getting good fat in your diet is essential for many of our systems. (Healthy skin, hormone balance, and vitamin D absorption, just to name a few!)
We also aim to get as many servings of vegetables in as we can, so subbing out traditional pasta for Spaghetti Squash is an easy swap. It helps us to control our blood sugar better while giving us more nutrients (and less carbohydrates for you carb counters out there!)
Now onto the Recipe!
Read more ...
I've got an easy, yet delicious"real food" recipe for you today!
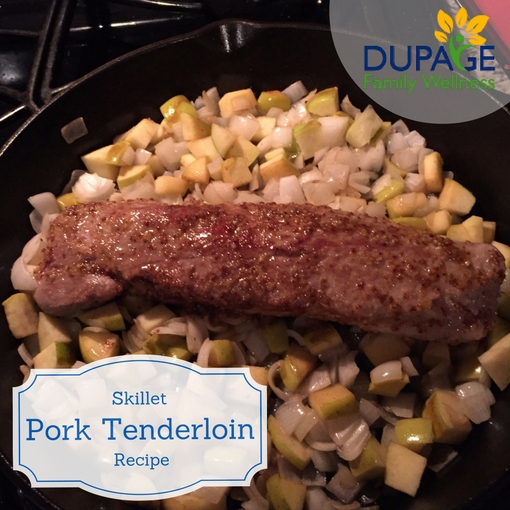
When I made my first pork tenderloin, I didn't realize there was a difference between a pork loin, and a pork tenderloin. I bought the loin and tried to use it in a tenderloin recipe. It is a much thicker cut of meat and the cook time was off. You could probably use this recipe for a pork loin, you'd just need to increase the cook time!
Ingredients
- Pork tenderloin
- 1 TBSP of coconut oil (or cooking oil of choice)
- 2-3 Onions chopped
- 2-3 Apples chopped
- 1 TBSP Honey (or maple syrup)
- 1 TBSP Dijon Mustard (I like stone ground)
- Salt and Pepper to taste
Directions
- Preheat oven to 425
- Heat up Iron Skillet over stove top
- Melt cooking oil in hot skillet
- Sear each side of tenderloin for 3 minutes
- Remove tenderloin and cook apples and onions in pan for 1-2 minutes to begin to soften
- Place tenderloin on top of apples and onions, and move iron skillet to oven
- Cook for about 15 minutes (internal temperature should reach 145- I had to cook mine for an extra 2 minutes)
Slice pork and enjoy! I supplemented with some carrots and broccoli that I had already roasted a few days prior using roasted veggie recipe.

Dr. Jamie Thomure
Is it possible to create a Thanksgiving menu with  all real, unprocessed, nourishing foods? Absolutely!
Here are several variations of the typical Thanksgiving fare that include only real food, unprocessed ingredients! As you begin planning your menu, try subbing out or adding one or more of these delicious recipes to your Thanksgiving feast! You may be surprised that by doing so, you’ll actually feel good after feasting, instead of the standard post thanksgiving lethargy and stomach ache. Enjoy!
Appetizers:
Google "Thanksgiving Appetizer Tray Images" and you'll be inspired by all the examples of festive vegetable, fruit, and cheese trays shaped like a turkey. Get some fresh ingredients, and have fun!
The Bird:
Easy Roasted Turkey with Sage Butter
Butterflied Turkey Recipe (with tutorial)
Stuffing:
Sausage, Apple and Cranberry Stuffing
Paleo Comfort Foods - Stuffing
Green Bean Casserole:
Paleo Green Bean Casserole
Sweet Potato Casserole:
Sweet Potato Casserole
Roasted Garlic and Butternut Squash Mash
Cranberries:
3 Ingredient Cranberry Sauce
Other Sides:
Roasted Brussel Sprouts with Bacon
Beautiful Brussels Sprouts (with onion and squash)
Butternut Squash Risotto
Cauliflower "Mashed Potatoes"
Desserts:
Pumpkin Bars
Pumpkin Pie
Apple Crisp
We'd love to hear about your favorite Thanksgiving recipes that use real, unprocessed ingredients. Please share recipes and photos on our facebook page. Let us know how it went for you.
Dr. Jamie Thomure and Joelle Kurczodyna
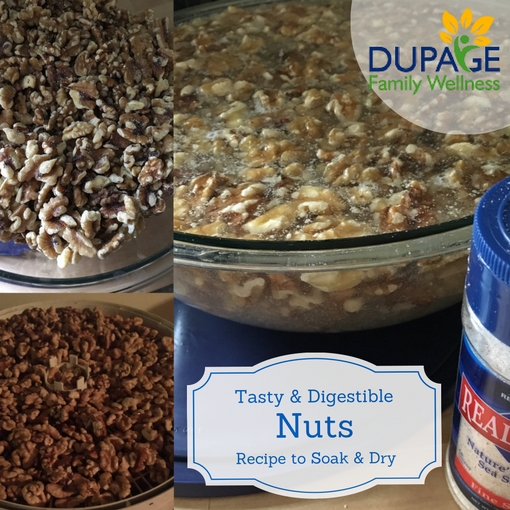
It is easy to make store bought nuts even tastier, and at the same time, easier to digest.
Nuts are nutrient dense, and provide a good balance of fat and protein, along with omega 3 fatty acids! They can be a great food for most people.
What Problem Occurs with Eating Raw Nuts?
One of the downsides to nuts is that they contain enzyme inhibitors like phytic acid. In nature, phytic acid prevents the seed from sprouting prematurely, safeguarding the nut until proper growing conditions occur. Unfortunately for humans, phytic acid can be considered an "anti-nutrient" because it binds to minerals (e.g. calcium, zinc, magnesium, iron, and copper) making them unavailable for the body, and inhibits enzymes that aid in digestion.
Although nuts are considered a nutrient dense, "healthy" food, the body will not benefit as much from nuts if the nutrients are not digested and absorbed. In addition, whole grains and seeds also have high levels of phytic acid, so eating them with nuts makes the problem worse. Read more about phytic acid. in nuts, grains, and seeds.
How Do You Solve This Problem?
It's easy! Soak and dry the nuts.
Our ancestors soaked nuts, seeds, and grains to start the process of breaking them down and making them easier to digest!
How Do The Nuts Taste?
I did a side by side taste test of soaked and dried nuts vs. nuts straight out of the bag. There is a definite difference. Nuts out of the package have a slightly bitter taste that is absent with the soaked and dried nuts!
Recipe to Soak and Dry Nuts
Ingredients:
- Nuts - any kind you like. For example: almonds, cashews, hazelnuts, pecans, pine nuts, walnuts, macadamia nuts, or brazil nuts. Note: Peanuts are not a nut, they are a legume, and have their own issues that are outside the scope of this recipe.
- Filtered water
- 1 TBSP sea salt
Directions:
-
Place nuts in a large glass bowl or mason jar
-
Cover completely with filtered water
-
Add sea salt and stir
-
Cover and let sit overnight or up to 24 hours
-
Drain and rinse nuts and lay them out on trays of dehydrator
-
Dry at a low temperature (about 105-150 degrees) for about 24 hours. If you don’t have a dehydrator, bake them in the oven at the lowest temperature of your oven for 12-24 hours.
-
Enjoy! Store your dried nuts in the refrigerator or freezer for best quality.
Soaking and drying nuts is not difficult, but it does take some time. I urge you to give it a try, and observe the difference. Let me know what you find on facebook!
Dr. Jamie Thomure

This delicious fruit cobbler has been my go to dessert this summer. It is gluten free, grain free, nut free, and delicious! I love its versatility and have made it with berries, peaches, and apples so far. I also love that it contains only a small amount of honey and is mainly sweetened by the roasted fruit.
This cobbler contains my new favorite grain free baking flour – Otto’s Cassava Flour! I heard a buzz about Otto’s, but it seemed expensive. What does a foodie on a budget do? Ask for it for your birthday to try it out! I was not disappointed!
What is Cassava Flour?
Cassava flour comes from the peeled and baked yuca plant root. The fiber and starch properties of this plant make cassava flour act similar to whole wheat flour in recipes.
Why Use Cassava Flour?
I prefer Cassava flour over whole wheat flour because it contains the additional fiber and nutrients from the yuca plant that are not contained in whole wheat flour. Whole wheat flour is mostly starch, and lacks nutrient density.
Today, most standard wheat flours have been treated and processed in undesirable ways making them often unrecognizable by the body and difficult to digest. Otto’s Cassava Flour is made from a clean, unadulterated source of yuca plants, making it more healthful and easier for the body to digest.
Cassava flour is popular because it can be substituted 1:1 for the regular flour in recipes. I’ve also made chocolate chip cookies and tortillas that you would never know were grain free and gluten free. Almond and coconut flour have different properties, and cannot be subbed 1:1 in traditional recipes.
Although I highly recommend cassava flour for the occasional grain free, sweet treat, it is still something to avoid as an every day part of your diet, as discussed in the previous article on moderation.
Otto's Cassava Flour is the only brand that I have researched and tried, therefore I recommend it. There are other cassava flours out there that may also work well but, but I do not have experience with them.
Grain Free Fruit Cobbler Recipe
Cobbler Filling Ingredients:
- Fruit of choice (6-8 peaches or apples, 3-4 cups of berries)
- 2 tsp of Otto’s Cassava Flour
- 1 tsp lemon juice
- ½ tsp Cinnamon (optional)
- 2 tbsp honey (optional – I usually omit and just enjoy the sweetness from the fruit)
Cobbler Topping Ingredients:
- 1 cup Otto’s Cassava Flour
- ½ tsp baking soda
- ½ tsp salt
- 1/3 cup cold butter (coconut oil or lard work also)
- 1/3 cup water
- 2 tbsp honey
- ½ tsp cinnamon (optional)
Directions:
Preheat oven to 425 degrees
- Make the filling: Mix fruit, 2 tsp of cassava flour, lemon juice and cinnamon and honey if desired in a large bowl until coated. Pour into an 8x8 glass baking dish and place in preheated oven for 10 minutes.
- While fruit filling is cooking make the topping. Mix 1 cup of cassava flour, baking soda, salt and ½ tsp of cinnamon. Using a fork, cut in the butter. Add water and 2 tbsp of honey. Mix until a dough comes together.
- Putting on the filling: Drop small spoonfuls of cobbler topping over the pan evenly. Bake for an additional 15-20 minutes until topping begins to turn golden.
Enjoy!
-Joelle Kurczodyna, NTP
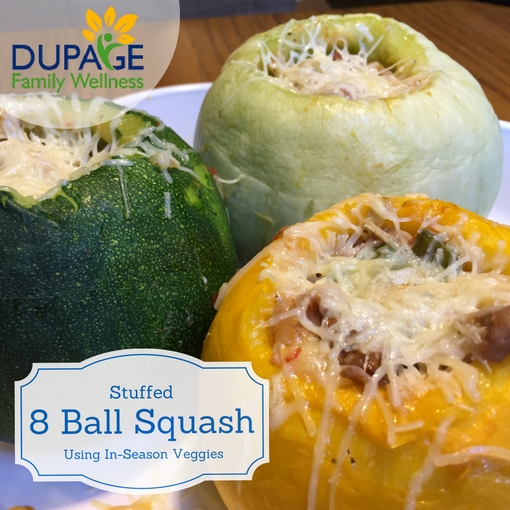
Earlier this week, my mom shared a great new farmers market find with me: 8 ball squash! I had never seen them before. Stuffing hollowed vegetables with meat and other veggies is one of my favorite meals. Let's try it with 8 Ball squash!
Ingredients:
- 3 - 8 ball squashes - (if you can't find 8 ball squash, this recipe would work great with zucchini or yellow squash- just cut in half and hollow like a boat. No need to do the boiling for 10 minutes step if you are using a long squash, but start baking it in the oven while the filling is in the pan)
- 1 Onion (chopped)
- 1 Tomato (chopped)
- 1 Sweet Bell Pepper (chopped) (Or use hot peppers if you like it spicy)
- 2/3 pound Italian sausage (or substitute meat of your choice). I used a spicy sausage to give it some good flavor
- 1-2 cloves Garlic (minced)
- Salt and Pepper to taste
- Cheese of choice- 1/2 cup (optional)
- (Optional) Additional veggies (e.g. carrots, sweet potato, celery, mushrooms)
Directions:
- Cut off the top of the squash
- Place squash (cut side down) in about an inch of boiling water and let cook for 10 minutes
- While squash is cooking, brown sausage and saute veggies in a pan
- Hollow out squash. Separate seeds, and add flesh to filling mixture.
- Add half of cheese to filling mixture (optional)
- Spoon filling mixture into hollowed out squash
- Top with other half of cheese
- Bake in oven at 350 for 10 minutes or until cheese is melted
Green Peppers are the bumper crop of our garden this year. Later in the week, I made the same filling, and stuffed 5 peppers. I added a small zucchini and a small pablano pepper instead of the bell pepper. Great way to use some produce that is plentiful or produce that you need to use.
Keep in mind that this recipe is totally flexible! It isn't like baking where ratios are important. If there is a meat, veggie, or type of cheese that you like- use it! I bet it will turn out great! Let us know if you try it- and if you find an awesome combo let us know on Facebook!
Dr. Jamie Thomure

